How to add Fitbit in the ConnectedLife App
- 27 Feb 2024
- 3 Minutes to read
- Print
- DarkLight
- PDF
How to add Fitbit in the ConnectedLife App
- Updated on 27 Feb 2024
- 3 Minutes to read
- Print
- DarkLight
- PDF
Article summary
Did you find this summary helpful?
Thank you for your feedback
This article will help you understand how you can add your Fitbit to the CLH App.
How to add Fitbit to the CLH app
After setting up your profile, we recommend connecting it to your Fitbit device for a more precise wellness score. You'll find this feature in your profile settings. You can link your device right away or choose to skip it but linking it instantly will enhance the accuracy of your wellness score.
Here are the step-by-step details on how to add Fitbit to the CLH App
Step 1:
After the first login to the CLH app, you will see options to complete your profile, or you can do it later.

If you complete your profile right away, then you will get the option to Manage devices.
.jpg)
Step 2:
If you do it later, then you can find the Manage devices option from the Profile section of the CLH app under the Linked devices.

Step 3:
Kindly be aware that, iOS users and Android Users will have different linking devices.
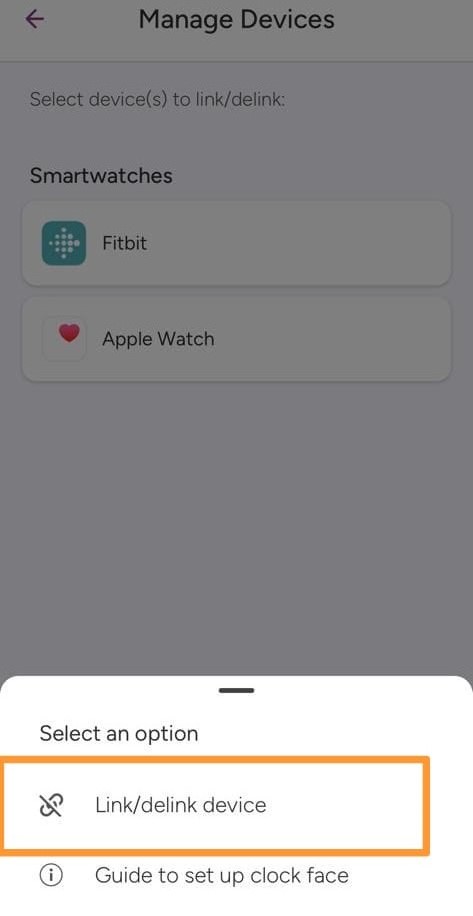
The two linking devices for iOS are 1. Fitbit, 2. Apple Watch.
.jpg)
The two linking devices for Android are 1. Fitbit, 2. ECG Patch
As we are linking Fitbit devices, we will select Fitbit to link.
.jpg)
Step 4:
You'll find options to link or delink. Select the link option and proceed.
 Step 5:
 Step 5:
Continue with your Fitbit account information (Google or by email address and password) to log in to the Fitbit app.(4)%20(1).jpg)
Step 6:
Launch the Fitbit app on your mobile device. Ensure that your Fitbit device is properly synced and connected to the app.
Step 7:
You must select your Fitbit device by tapping the “Watch/Phone” icon in the top left corner.

You have to choose your Fitbit device.

Step 8:
Now Tap on Gallery.

Step 9:
In the search bar, look for your app-related Clock face. Example: If you search for “Wellness Plus CLH” Clock Face, you will find it accordingly.
Step 10:
Once you've located your Clock Face, Proceed with the installation process.
Ensure all necessary permissions are selected.

Step 11:
Wait for the download to complete.

A stable internet connection is essential for a successful download. If the download is interrupted, retry the process.

Once the download is complete, the Clock Face will be installed and selected on your Fitbit device.
.jpg)
Step 12:
After the Clock Face installation, Go to the Profile section of the CLH App, then scroll down to Linked devices.
You will experience "Clock Face Not Installed".

You will also see that your Fitbit Device is locked. To unlock the Clock Face, you have to follow the next process steps.

Step 13:
Enter the "Customise” section of the selected Clock Face in the Fitbit app.
.jpg)
Then Login to your Fitbit account again.

Step 14:
Continue with Google or by email address and password to log in.
(4).jpg)
Step 15:
For Android:
After successful login from the Fitbit app, open the CLH App.
Go to Linked devices. You will see that your Clock Face is now successfully Installed.

For iOS:
After successful login from the Fitbit app, a pop-up will appear, Select the “Open” option.

Open the tabs in the browser, and you will see a Companion Settings Page. Open and reload the page.

You will see that, your Clock Face has unlocked.

Tips:
- Only one smartwatch can be linked to the CLH App at a time. When adding your smartwatch, ensure that no other smartwatch is currently linked to prevent issues with linking, receiving reminders, and accessing CLH Clock Face features. Maintain a smooth connection by linking one smartwatch at a time.
- If you encounter difficulties while linking and delinking devices, we recommend resolving the issue by clearing all app data from both the CLH App and the Fitbit App. After doing so, attempt to link the devices again.
- Please note that it takes approximately 30 minutes to update the ConnectedLife app with the latest Fitbit data. Stay proactive in maintaining your devices for seamless integration and functionality.
Was this article helpful?